- Prepare your Schema
- Prepare your Catalog
- Upload your Feed
- Full Feed Upload
- Delta Feed Upload
- Single Record Upload
- Check Product Count
- JavaScript Based Integration
- HTML Based Integration
- Introduction to GTM
- Requirements
- Introduction
- Events
- API Integration
- Search Endpoint
- Authentication
- Header
- Request Parameter
- Response Components
- Explanation Request Parameter
- PDP API Format
- Sample Request
- Request Parameters
- Response Parameters
- System Requirements
- Install SDK
- Initialize SDK
- Unbxd Commerce Search
- Integrating Unbxd Autosuggest
- Unbxd Analytics
- Unbxd Browse
- Unbxd Recommendations
- Sample App
- Installation
- Unbxd Analytics
- Unbxd Commerce Search
- Unbxd Autosuggest
- Unbxd Browse
- Unbxd Recommendations
- Sample iOS App
- Quickstart with Unbxd Template
- Quick Integration to your site
- Detailed Guide
- Authentication
- Types of Pages to Render
- Configuring the Page
- Instance Methods
- More Information
- Available Configurations
- Libraries
- QuickStart
- Authentication
- Configuring Autosuggest
- Sample Options Object
- Handlebar Functions
- List of Configs
- Search Template
- Loader Config
- Facet Config
- Pagination
- Spellcheck
- Sort Config
- PageSize Config
- Breadcrumb Config
- Product Views
- Variants
- Quick Integration with Unbxd template
- Quick Integration to your site
- Installation
- Authentication
- Types of pages to render
- Configuring the page
- PageSize Config
- More Info
- Endpoint
- Authentication
- Headers
- Request Parameters
- API Response
- Response Components
- Create an Unbxd Account
- Create an Unbxd Site
- Upload a Catalog
- Setup Search
- Integrate Search
- Create an Unbxd Account
- Create an Unbxd Site
- Upload a Catalog
- Setup Search
- Integrate Search
- Plugin Installation
- Configuration
- Uninstallation
- Test Plugin Installation
- Installation
- Authentication
- Catalog
- Catalog Sync
- Product Integration
- Custom Template
- Indexing Queue View
- Feed View
- Upgrade
- Uninstall
- Installation
- Authentication
- Catalog
- Cron Job
- Product Config
- Uninstall
- Installation
- Configuration
Shopify Integration
Unbxd App for Shopify helps you use Unbxd Site Search within your Shopify store. This app allows companies (irrespective of their size) to integrate their websites on the Shopify platform with Unbxd’s Site Search solution.
Unbxd Site Search With Shopify empowers:
- Automatic Catalog Sync: Each product addition or deletion is sent to Unbxd servers automatically based on the schedule set up by you, to keep the data at Unbxd servers up-to-date.
- Integrated Indexing: Using the Unbxd extension, your website data is fed to the UNBXD servers, and the catalog goes through an indexing process that transforms them into searchable data. You will see this happen in the following sections when we talk about the Unbxd plugin Installation in your Shopify website., This helps the extension for Shopify, index millions of products in a few minutes and then upload your catalog to Unbxd in a few seconds.
- Analytics Integration: The Unbxd Extension for Shopify automatically tracks user analytics and behavior. This is essential in order to provide accurate and user-specific search results. The extension analyzes every user event and tracks product clicks, products added to cart, and orders. With this information, a user profile is built for every user based on his/her affinity to a certain category, brand, or price.
- AutoSuggest Integration: When the Unbxd plugin is installed, along with search, Unbxd autosuggest is a unique feature that is also integrated into your website. It can be customized for keyword suggestions, top queries & popular products etc.. For example – If a user searches for “shi” then autosuggest will spit out the keyword suggestions like “red shirt”, “white shirt”, “official shirt merchandise” etc along with popular products based on the analytics.
This section will help you:
- Install the Unbxd App in Shopify website
- synchronize your product catalog with UNBXD and
- integrate analytics.
- Access levels – Store Owner, Administrator settings
- Unbxd needs store access permissions to view and modify content, products and theme.
- Further, Unbxd needs store access permissions to generate tokens to access your store’s storefront APIs.
- Also, Unbxd needs store access permissions to view basic configuration settings.
Plugin Installation
To install the Shopify app:
- Signup to the Unbxd console at https://console.unbxd.io/signup

Please note: Once you click on Create My Account, your credentials will be sent for review. Once done, your account will be sent for review to the back end team. Once the account has been approved, the customer will be notified. .Once done, you can use the same credentials to login to your account.
- Create Unbxd Site by completing the following sections:
1. Name your site: This is used to assign a unique name for your business to help identify the site key. Please ensure that the words in the site key are without spacing.
2. Environment: This is used to select the development environment you wish to work in. Choose any one from Prod, Dev, QA or Tester.
3. Vertical: This is the most important option as it requires you to assign the type of business you are associated with. For example, if you are a computer hardware vendor, please select the vertical as ‘Electronics’.It is one of the premium features Unbxd offers customers.
4. Platform: This highlights the platform in which the UNBXD plugin will be installed. Select this as Shopify.
5. Language: Here you can assign the language you want to use. Primarily this should be the same as your Shopify website. Ex: English. Once the above steps are complete, click on Proceed to move to the next screen. - Choose the “Shopify Plugin” from the Platform section
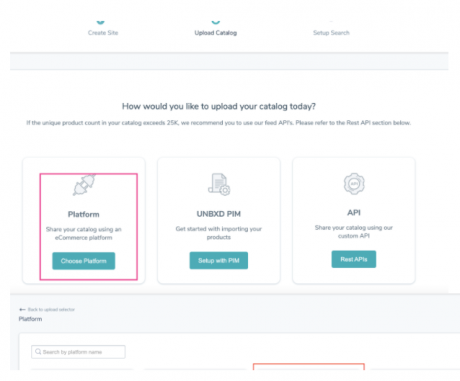
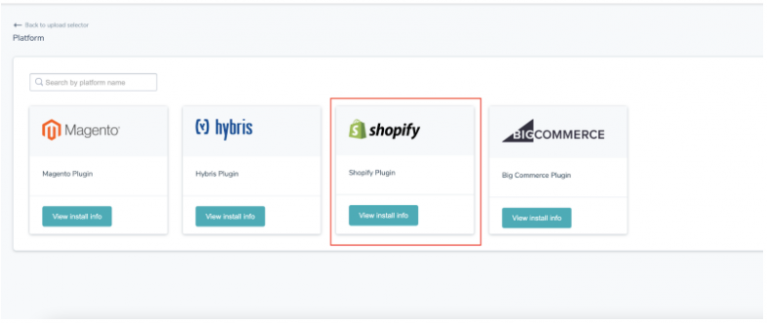
- Get the shopify store domain of your shopify store
- Enter the store domain name in the Unbxd console.
Please Note : The domain value should not contain any ‘https’ or forward slash “/” as this will prevent you from proceeding with UNBXD installation.
- Accept the terms and conditions & click the Install Plugin button You will then be redirected to your Shopify website and the below screen appears, prompting you to install the UNBXD app.
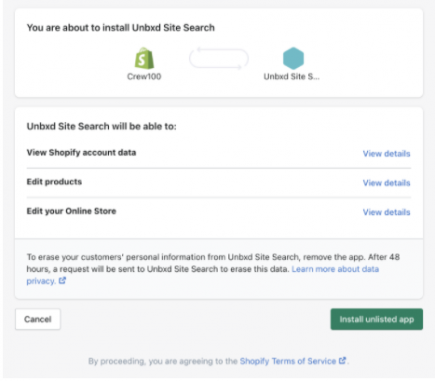
- Click on the ‘Install unlisted app’ button. On the next screen, Unbxd automatically starts fetching the catalog from the Shopify store. The process may take some time but if indexing takes more than a few minutes then contact support.

Configuration
Once the Unbxd Shopify app is installed, the below snippets will be added to your store’s website under the “snippet” section of the theme.
- unbxd-analytics.liquid: Snippet contains Unbxd analytics library with site credentials.
- unbxd-autosuggest.liquid: Snippet contains Unbxd autosuggest code with JS and CSS configuration.
- unbxd-search.liquid: Snippet contains Unbxd search code with JS and CSS configuration.
- Configure Analytics in shopify store:
The following steps will help you integrate the Unbxd analytics tracking system into your Shopify website.
Important Note: The following sections will allow you to integrate new code snippets for UNBXD. Please maintain a copy of the old code and save it as backup with you. This is important and will be explained in the next section.
1.1 Firstly, go to the Online Store - Themes section of the admin panel of your store and click Actions – Edit code.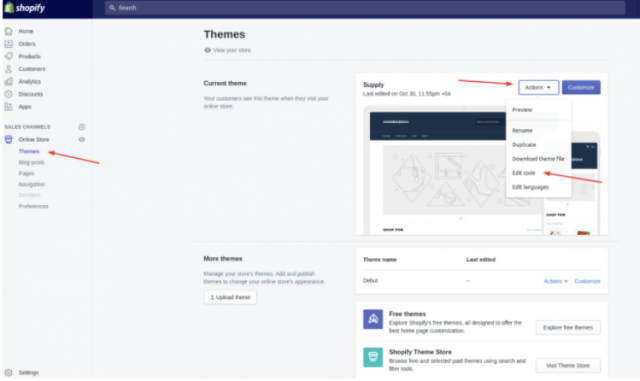
1.2 Then you’ll need to update the theme.liquid template. Go to Online Store -> Themes -> Actions -> Edit Code and select the theme.liquid file as shown below.
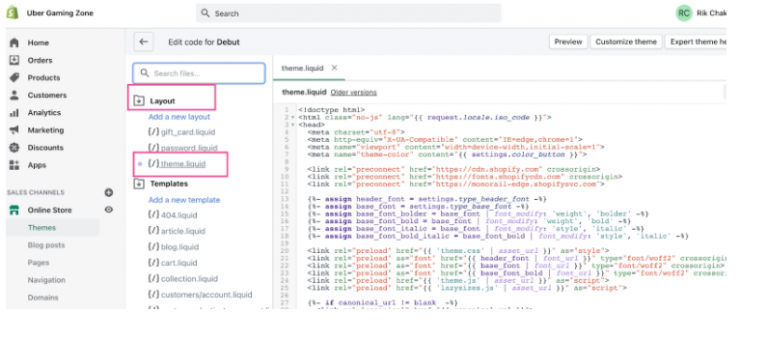
1.3 Add the below snippet immediately after the start of the body tag.
{% include 'unbxd-analytics' %}
-
- Integrate Unbxd autosuggest in shopify store:
-
- Firstly, go to the Online Store – Themes section of the admin panel of your store and click
Actions - Edit code. - Access the
theme.liquidfile and update it with below autosuggest snippet before the end of body tag as show below:
- Firstly, go to the Online Store – Themes section of the admin panel of your store and click
- Integrate Unbxd autosuggest in shopify store:
{% include 'unbxd-autosuggest' %}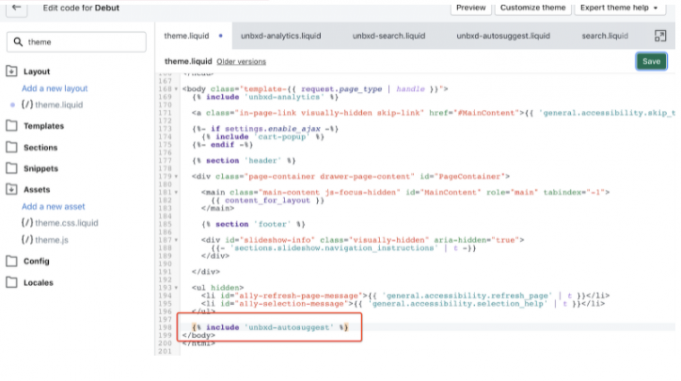
3. Enable Unbxd search in shopify store:
3.1. Firstly, go to the Online Store – Themes section of the admin panel of your store and click Actions – Edit code.
3.2. You need to change the search.liquid template. To do it, go to Templates – search.liquid.
The code will look like this: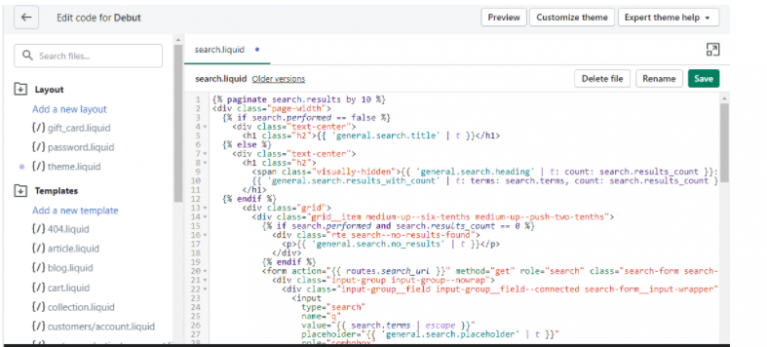
Simply replace the Shopify code shown above that shows search with the following code:
{% include 'unbxd-search' %}
Uninstallation
In case you no longer wish to utilize the UNBXD app, you can uninstall the UNBXD app from the Apps section of your Shopify website.
IMPORTANT NOTE: Upon uninstallation of Unbxd app, it will remove the above snippet. So before uninstalling please do revert all the above liquid files manipulation that is being pushed while installing the unbxd plugin.

Creating a backup of the original code is crucial in this section as upon uninstallation of Unbxd plugin, it will remove the added snippets. The remnant code may or may not function properly so it is a better alternative to restore the changes to the initial Shopify code.
So before uninstalling, please revert all the changes to the above liquid files to the original state.
Test Plugin Installation
In this section, we will discuss how to test if the Unbxd plugin is correctly configured.
Note: In order to verify the plugin is working, you will need to access the debugging console for your browser. Since Google Chrome is one of the most preferred and popular browsers in use today, we will demonstrate the use of the same using Google Chrome browser.
1.1 Right Click on the middle of the Shopify website Products/Catalog page and select the ‘Inspect option This will open the Console Debugging Section at the end of the browser as shown below.
1.2 Select the Network tab and you will get the following screen
1.3. Next, with the network console on, you will see a message displaying that all network activity is being recorded in that particular section of the console.
Now scroll to the top and click on the search icon to turn on search mode.
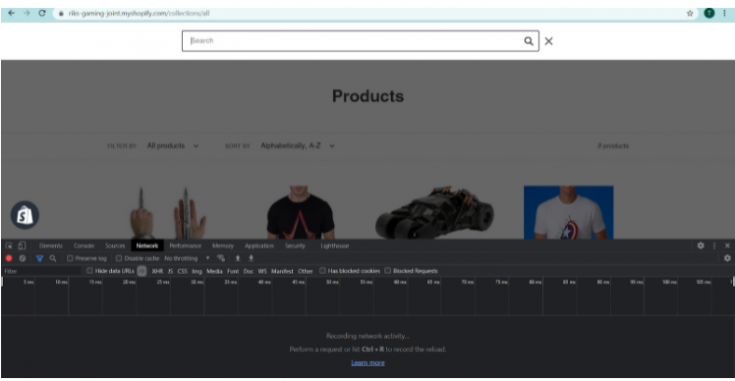
1.4 You can choose to enter the first few characters and you will automatically see the product appear in the dropdown box as a suggestion.
For example, let us type ‘pla’ to search for the product Sony Playstation. You will see the network console change and the screen will appear as shown below: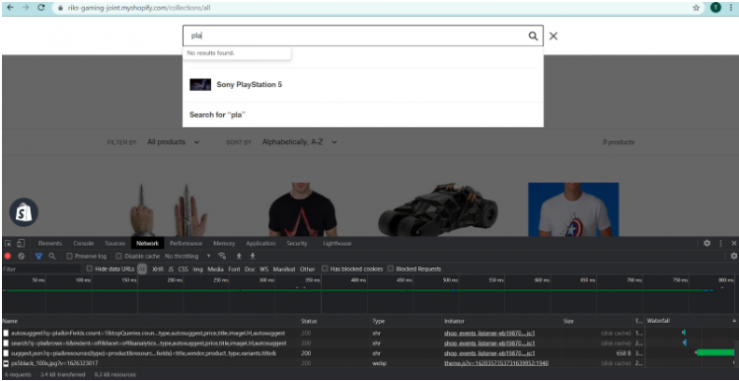
1.5. You can finish typing the product name and click on Enter
OR
You can choose the suggested product to complete the search operation.
Upon closer inspection of the network console, you will see that all search and autosuggest activity is going through the Unbxd servers as is reflected in the code as shown below

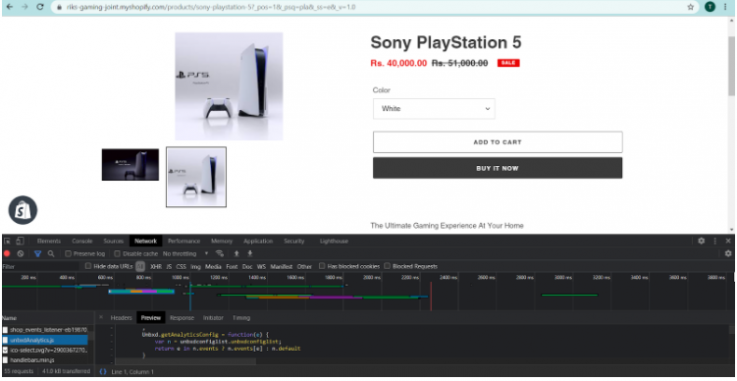
Please note: In case there was an error or the plugin was not configured properly, the search query would record the default network activity of Shopify’s own code in JSON.
- Did this answer your question?
On this Section
- Automatic Synchronization
- Manual Synchronization
- Command Line Interface
- Manual Upgrade
- Upgrade via Composer